WuShaolin

悟已往之不谏,知来者之可追!

0%

数据源安装Nginx

本次通过数据源安装Nginx是在Ubuntu系统下进行演示:

  1. 通过数据源地址下载Nginx压缩包

wget https://nginx.org/download/nginx-1.19.7.tar.gz

  1. 解压上面的压缩包tar -zxvf ...

  2. 进入到上面的解压目录后,首先检查C的编译环境./configure

  3. 不出意外的话,这里会报错,有的包缺失。

  4. 安装缺失的包

    通过Ubuntu的apt-get安装上面缺失的包, apt-get install libpcre3 libpcre3-dev zlib1g zlib1g-dev libssl-dev

  5. 再次检查配置项内容./configure

  6. 指定目录下安装

通过自定义配置项进行安装配置项

./configure --sbin-path=/usr/bin/nginx --conf-path=/etc/nginx/nginx.conf --error-log-path=/var/log/nginx/error.log --http-log-path=/var/log/nginx/access.log --pid-path=/var/run/nginx.pid --with-pcre --with-http_ssl_module

  1. 根据前面生成的makefile,用make命令去编译
  2. 继续安装make install
  3. 此时就安装全部完成了,nginx -V 会正常显示,直接输入nginx也不会报错
  4. 最后查看进程 ps aux | grep nginx也正常显示

直接输入购买的阿里云ECS服务器的公网IP可以看到Nginx的欢迎页面了。

个性化注释

GoLand文件和代码模板增加

/**
 * @Author: wushaolin
 * @Author: wslsdust@163.com
 * @Date: ${DATE} ${TIME}
 * @Desc: ${Desc}
 */

动态模板增加

/**
 * @Author: wushaolin
 * @Author: wslsdust@163.com
 * @Date: $date$ $time$
 * @Desc: ${decription}$
 */

开篇词 🤗

这是一个系统学习webpack的系列文章,在多年的编程学习之后,我知道:这个系列注定不会一帆风顺🙄,同样我也知道在这些失败的背后隐藏着通往美好未来的秘密,星光不问赶路人,时光不负有心人,出发吧。

友情提示 🤣

本系列开始之前,请调整好心态,我们要做好长(总)期(有)作(报)战(错)的准备😌。经过我的的第二次折腾webpack,得出一个重要结论:

阅读全文 »

路由容器

<router-link to="/"></router-link>

to的内容放到容器<router-view></router-view>

什么叫数据驱动式

上一篇文章大体了解了Vue项目的起手式,本文深入一下挂载实例的本质。在这之前先了解一下vue的一个开发理念-数据驱动式

传统的jq开发方式是操作DOM,进行视图层的更新,现代主流的web开发通过修改数据的形式来进行视图层的更新,也就是说数据和视图层有了双向的或者单向的关联关系,DOM变成了数据的一种映射关系。

简单的示例

<div id="app> 
  {{ message }} 
</div>
var app = new Vue({
  el: '#app',
  data: {
    message: 'hello Vue'
  }
})

上面的div的内容将会渲染成hello Vue,而且修改div内容里面vue实例里面message也会变化,这种双向绑定后续文章再讨论😊,本文主要分析上面div的内容怎么变成了hello Vue

那么new Vue干了什么呢

在上一篇文章中我们看了Vue的构造函数

import { initMixin } from './init'
import { stateMixin } from './state'
import { renderMixin } from './render'
import { eventsMixin } from './events'
import { lifecycleMixin } from './lifecycle'
import { warn } from '../util/index'

function Vue (options) {
  if (process.env.NODE_ENV !== 'production' &&
    !(this instanceof Vue)
  ) {
    warn('Vue is a constructor and should be called with the `new` keyword')
  }
  this._init(options)
}

initMixin(Vue)
stateMixin(Vue)
eventsMixin(Vue)
lifecycleMixin(Vue)
renderMixin(Vue)

export default Vue

当我们通过new关键字创建一个vue实例时,会调用原型上的_init(),这部分代码也在上一篇文章中提到了,这个方法的最后调用了vue原型上的$mount(),这个方法在src/platforms/web/entry-runtime-with-compiler.js中,(platforms的其他平台也有,先以这个版本为例)

const mount = Vue.prototype.$mount
Vue.prototype.$mount = function (
  el?: string | Element,
  hydrating?: boolean
): Component {
  el = el && query(el)

  /* istanbul ignore if */
  if (el === document.body || el === document.documentElement) {
    process.env.NODE_ENV !== 'production' && warn(
      `Do not mount Vue to <html> or <body> - mount to normal elements instead.`
    )
    return this
  }

  const options = this.$options
  // resolve template/el and convert to render function
  if (!options.render) {
    let template = options.template
    if (template) {
      if (typeof template === 'string') {
        if (template.charAt(0) === '#') {
          template = idToTemplate(template)
          /* istanbul ignore if */
          if (process.env.NODE_ENV !== 'production' && !template) {
            warn(
              `Template element not found or is empty: ${options.template}`,
              this
            )
          }
        }
      } else if (template.nodeType) {
        template = template.innerHTML
      } else {
        if (process.env.NODE_ENV !== 'production') {
          warn('invalid template option:' + template, this)
        }
        return this
      }
    } else if (el) {
      template = getOuterHTML(el)
    }
    if (template) {
      /* istanbul ignore if */
      if (process.env.NODE_ENV !== 'production' && config.performance && mark) {
        mark('compile')
      }

      const { render, staticRenderFns } = compileToFunctions(template, {
        outputSourceRange: process.env.NODE_ENV !== 'production',
        shouldDecodeNewlines,
        shouldDecodeNewlinesForHref,
        delimiters: options.delimiters,
        comments: options.comments
      }, this)
      options.render = render
      options.staticRenderFns = staticRenderFns

      /* istanbul ignore if */
      if (process.env.NODE_ENV !== 'production' && config.performance && mark) {
        mark('compile end')
        measure(`vue ${this._name} compile`, 'compile', 'compile end')
      }
    }
  }
  return mount.call(this, el, hydrating)
}

mount方法干了啥

上述代码的第一句const mount = Vue.prototype.$mount,使用一个局部变量mount用来缓存原型上的$mount,接下来又重新定义了该方法。

原型上的$mount方法src/platforms/web/runtime/index.js

// public mount method
Vue.prototype.$mount = function (
  el?: string | Element,
  hydrating?: boolean
): Component {
  el = el && inBrowser ? query(el) : undefined
  return mountComponent(this, el, hydrating)
}

重新定义的方法中首先对挂载点el的类型做了限制-不能是document.body document.documentElement,也就是不能是body html这样的根节点。

其次,如果没有定义render方法的话,会把el或者template字符串转换成render方法,也就是说,Vue组件最终都会需要render方法。

学习源码的第一步是下载源码,然后分析代码的目录结构。

Vue源码起手式🤚

通常,./src目录是源码目录,对于当前项目来说,src/platforms/web/entry-runtime-with-compiler.js,以这个文件作为突破口,这只是一道门🚪,虚掩着。

阅读全文 »

Mac系统更新到10.15大版本之后,我遇到的最常见的大bug就是:npm安装时经常报gyp: No Xcode or CLT version detected!

解决方法:

$ sudo rm -rf $(xcode-select -print-path)
$ xcode-select --install

初识注解

前面两节学习了springboot的基本使用,其中大量使用了注解来减少代码量,想必大家都觉得挺奇怪的吧。

所以第三节,稍微停顿一下增删改查的脚步,补补一些基础(๑•̀ㅂ•́)و✧。

对于前端来说,注解这个概念很陌生,如此神秘的力量是如何发挥作用的呢,今天学习一下java中的注解:一种形如@xxx的东东,xxx一般是大写字母开头。

什么是注解

注解Annotation是在java源码中对于类、方法、字段、方法参数的一种特殊注释

阅读全文 »

初识mybatis

在第一节中学习了如何初始化一个项目,并且写了一个最最最最😄简单的接口,但是项目中数据肯定是来自数据库,在传统java中使用JDBC来操作数据库,进入web部分后,现在主要采用mybatis持久层框架做SQL映射(把数据库内容映射成对象,Object Relational Mapping)来操作数据库,在spring boot中集成到了mybatis-spring-boot-starter中。

阅读全文 »

初始化SpringBoot项目

这是前端初学SpringBoot系列的第一节,学习如何初始化一个空项目进行后续开发。目前有两种方式进行初始化:

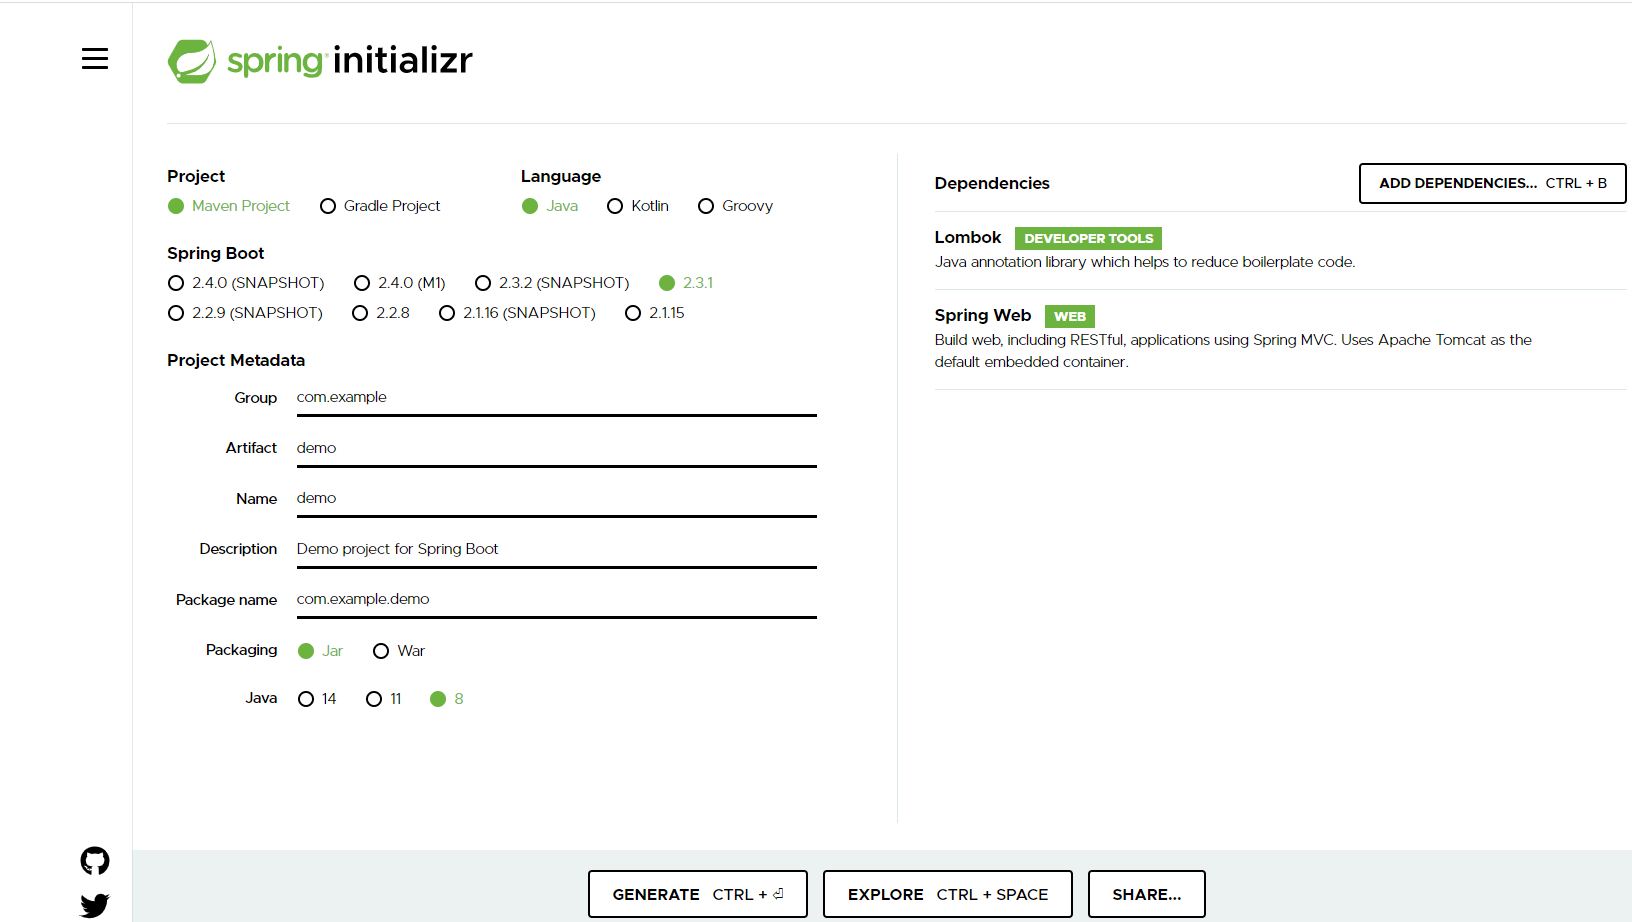
  1. 去官网https://start.spring.io/直接按照下图进行初始化,相关配置项具体内容可查看文档,SpringBoot只要不选择SNAPSHOT即可。
  2. 直接通过IDEA进行初始化
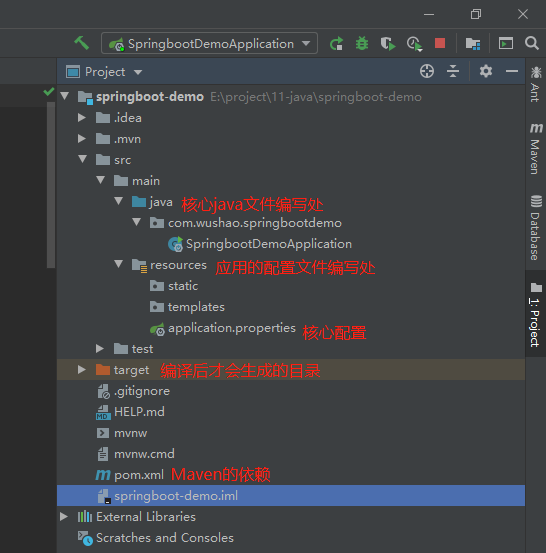
  3. 初始化后的目录结构如下图所示:
  • 核心java文件在src/main/java内部。
阅读全文 »

引子

这篇文章源于几道面试题。

//demo 01
{
  function test() {}
  test = 123
}
console.log("test", test)
{
  test00 = 123
  function test00() { }
}
console.log("test00", test00)
// demo 02
{
  function test01() {

  }
  var test01 = 123
}
console.log("test01", test01)

// demo 03
{
  var test02 = function () {}
  var test02 = 123
}
console.log("test02", test02)
// demo 04
{
  function test03() {}
  test03 = 123
  function test03() {}
}
console.log("test03", test03)
// demo 05
{
  function test04() {}
  test04 = 123
  function test04() {}
  test04 = 234
}
console.log("test04", test04)
阅读全文 »